Solidworks has many shortcuts and options built-in which drastically reduce the amount of clicking and menu operations required for drafting. However, I’ve been surprised to see some experienced engineers and drafters don’t implement them. The shortcuts listed here are all simple and easy to implement and will save you time immediately. If you’re not using them already, I guarantee that they will speed up your work and make Solidworks more enjoyable to use.
1. Use Mouse Gestures
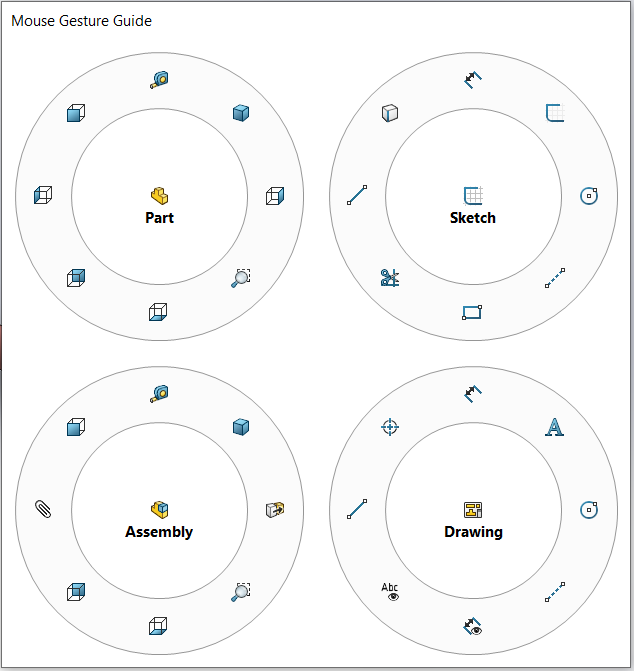
The single best tip I can give to speed up your work is to bind your commonly used functions to mouse gestures. Mouse gestures are activated by right-clicking and dragging to a cardinal direction to use a pre-set function without needing to go through any other menu or toolbar. To setup your gestures, go to Tools>Customize>Mouse Gestures.
Here are some key functions I use daily on each wheel:
- Part: Measure
- Sketch: Smart Dimension, Line, Rectangle, Circle, Snip, Centerline
- Assembly: Measure, Mate
- Drawing: Smart Dimension, Line, Centerline, Circle, Show/Hide
2. Keyboard shortcuts
These keyboard shortcuts are especially useful when showing parts to a team member or during a meeting. Using them allows you to quickly and cleanly respond to requests for different viewpoints.
- Ctrl+Tab: Quickly swap between files you have loaded. You can hold control and keep hitting Tab to cycle through parts
- Ctrl+1, Ctrl+2, Ctrl+3, etc.: Move the view to the front plane, back plane, right plane, etc.
- Ctrl+7: Move the view to an isometric view
- Ctrl+8: Move the view normal to your selected face
3. Make use of the symmetric property in sketches
Properties are a commonly understood shortcut to reduce the amount of dimensioning required in sketches, but I’ve found that the symmetric property speeds up the largest amount of work.
If you have two straight lines, arcs, or circles that need to be symmetric, draw a quick centerline between the lines (easily done with Mouse Gestures), hold Ctrl, and select both lines and the centerline. Then, choose the Symmetric property to make them symmetric across the centerline, which gives them the same positioning and equal size in one property rather than in multiple.
4. Use Pattern Driven component patterns
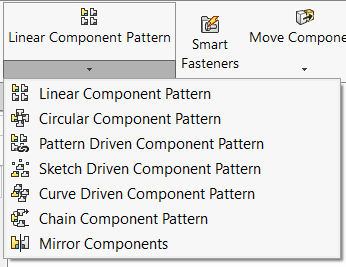
For assemblies, adding in dozens of fasteners is a pain when the holes aren’t in a linear or circular pattern. Rather than inserting each individually, if the holes were made in the same Hole Wizard feature you can choose to pattern one fastener across the Hole Wizard pattern. Go to Assembly > Linear Component Pattern > Pattern Driven Component Pattern and select both the fastener and the Hole Wizard feature to copy the fastener across all of the holes.
This reduces the amount of time you need to spend mating each fastener, and it also speeds up load times for assemblies.
5. Mate parts to basic planes to speed up assembly load time
Mating parts to other parts is the simplest method of building assemblies. However, assemblies with dozens to hundreds of parts and fasteners can be setup such that mates refer to other mates for multiple steps rather than to the base planes, which make Solidworks load assemblies slower and makes it slower when you manipulate them.
To dramatically speed up assembly load times, mate the basic planes of each part and sub-assembly (Front, Top, and Right) to the basic planes of the assembly where possible. Doing so can halve load times or better, and it helps prevent Solidworks from crashing.
6. Use custom properties in your sheet template
To make a sheet template, start a new drawing, go to the Sheet Format toolbar and click Edit Sheet Format. From there, you can click Automatic Border to delete sheet elements and create a border around the drawing. Then, you can draw a title block and whatever tables you would like to see on every drawing with this sheet format.
To link title block properties to custom properties, add a note while editing the sheet format that says $PRPSHEET:{Name_of_Property}. Then, you can save the format by clicking File > Save Sheet Format.
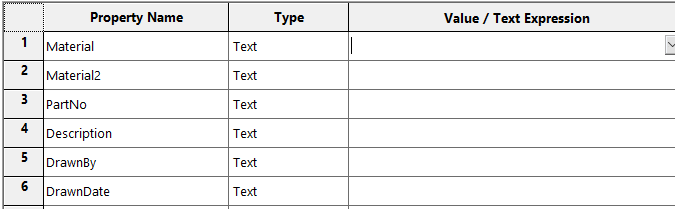
In a part or assembly, click File > Properties to bring up a list of custom properties. By giving them the same name as the properties in the sheet notes, they will automatically update.

And one last extra tip – in an assembly you can right click and select ‘Show Hidden Components’ to shift the view to only show hidden components, which you can then click to unhide them.
I hope you found these tips useful!