What is OAuth2?
OAuth2 stands for Open Authorization Version 2. OAuth is an authorization framework that provides authorization flows for web and desktop applications. OAuth2 delegates authentication to the service that hosts and manages a user’s account. OAuth’s main purpose is to provide secure API access on behalf of a user to third-party applications.
OAuth Roles
OAuth consists of four roles:
- User
- Client (Third Party Application)
- Resource Server
- Authorization Server
This post will focus on implementing the client role in LabVIEW and implementation of the other roles are outside the scope of this post.
Authorization Flow
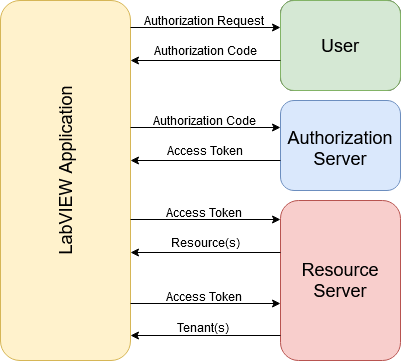
- The application requests authorization from the user to access resources.
- This is usually in the form of opening a login URL in the browser.
- If the user authorizes the application, the application receives an authorization code.
- The application requests an access token from the authorization server using the authorization code.
- The authorization server validates the application identity and code, then sends an access token to the application.
- The application may now access resources from the resource server using the provided access token.
Note: Some resource servers segment resource access by tenant. A tenant is a group/organization that a user belongs to. When working with a multi-tenanted platform, the authorization flow after step 4 changes to the following:
- The application uses the access token to request a list of tenants from the resource server.
- The application uses a combination of access token and tenant ID to access resources from the resource server.
LabVIEW Implementation
A quick note. For this blog post, I will implement an OAuth2 client that authenticates with Xero. Xero is an accounting software platform for small businesses. Xero can be located at: https://www.xero.com/us/
Set-Up
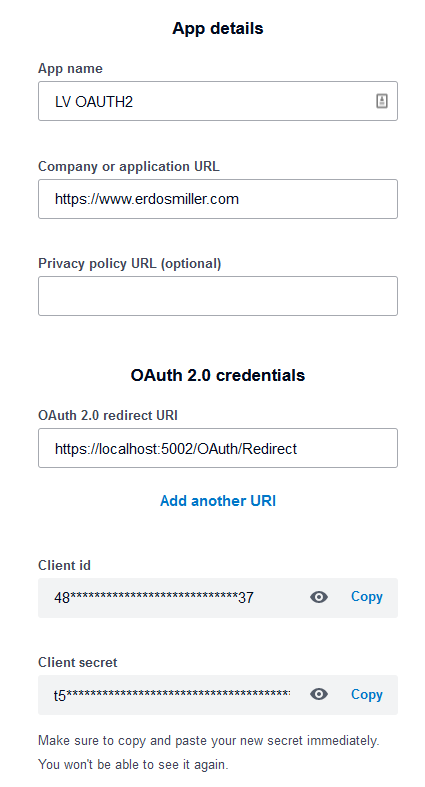
Before we can begin implementing our client, we need to register an application with the authorization server. The steps are different from each service. However, for each, you must provide an application name and a redirect URI.
We want to receive the redirect, so set the redirect URI to https://localhost:5002/OAuth/Redirect.
Note: 5002 is arbitrarily chosen. You can select any free port.
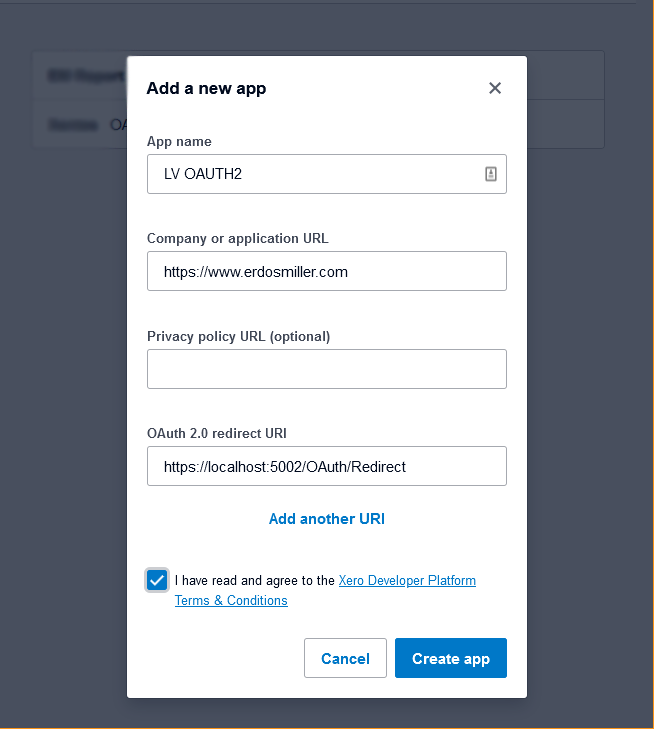
Creating an application will result in receiving a Client ID and Client Secret. Save both values as they are mandatory for authentication. If your source code is going to be uploaded to a repository, DO NOT hardcode these values. In the event of unauthorized access to your source code, your application’s identity can be stolen.
Authorization Request
The authorization request is a very simple process. The entire step consists of redirecting the user to a specific login URL in the browser.
Xero specifies the login URL as such:
https://login.xero.com/identity/connect/authorize?response_type=code&client_id=YOURCLIENTID&redirect_uri=YOURREDIRECTURI&scope=openid profile email accounting.transactions&state=123
To implement this step, we only need to take advantage of two VIs:
- Format into String
- Open URL in Default Browser
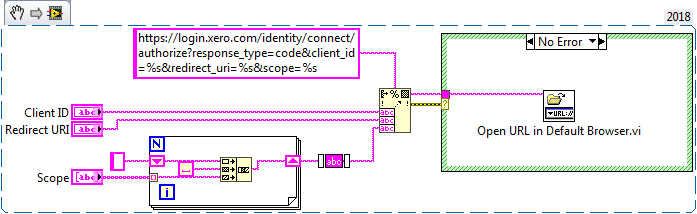
Note: The state parameter is for our use only. It allows us a way to transfer information between the authorization request and redirect. This post will not make use of it.
The above code will open the login URL in the browser. The user will be asked to login and grant permission to our application. When the user grants authorization, the browser will be redirected to our redirect URL.
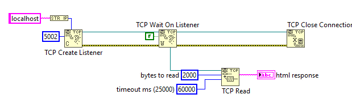
Obtaining the Authorization Code
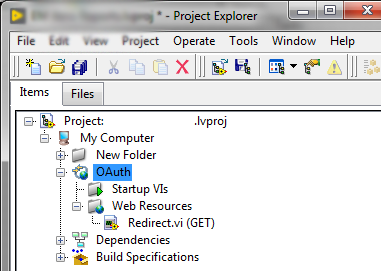
To handle the redirect, we need a web server to redirect to. It’s time to add a web service to the project. Web service basics are outside the scope of this blog post. National Instruments provides a tutorial on creating web services at https://zone.ni.com/reference/en-XX/help/371361R-01/lvhowto/build_web_service/.
The redirect URL we specified when registering our application is a result of how we name our web service and web resource. In this example, the web service will be named “OAuth” and we’ll create a GET resource “Redirect.vi”.
“Redirect.vi” is responsible for reading a code parameter from the GET request. This code must then be transferred to our application to be later sent to the authorization server for an authorization token.
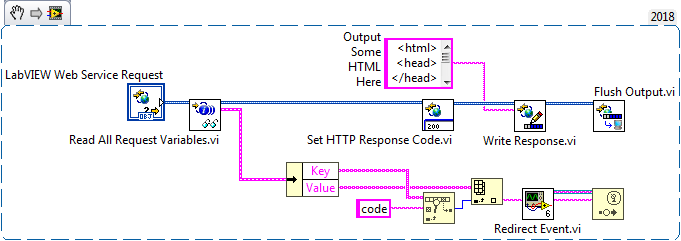
When built into an executable, the web service occupies the same memory space as the application. This means that we can share global variables and references between an application and the web server. For this example, I chose to transmit the authorization code via a user event reference stored in a functional global.
Requesting an Access Token
With user authorization granted to us, in the form of an authorization code, we may now request our access token from the authorization server. There may be some differences between services, however, Xero dictates the following procedure:
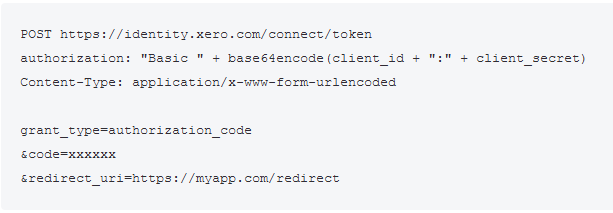
We need to send a POST request with the following:
- “Authorization” header set to a base64-encoded combination of our application’s client ID and client secret.
- Set the Content-Type header to x-www-form-urlencoded.
- Fill the POST buffer with:
- grant_type=authorization_code
- code=<code provided to us>
- redirect_uri=<our redirect uri>
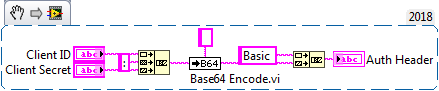
The authorization code is a simple concatenation and base64 encode:
Next, let’s set up an event structure to send our POST request in response to a new code:
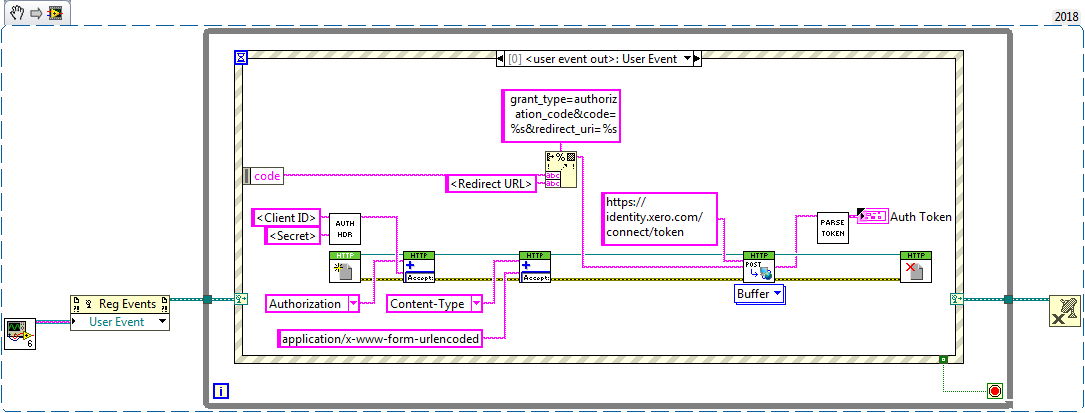
A “Format Into String” is enough to generate the urlencoded form data for the POST body. We can use the “Set Header” VIs from the HTTP Client library to specify the Authorization and Content-Type headers.
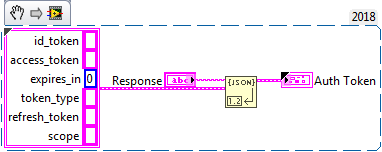
The last step is to parse the JSON response from the authorization server. The response we receive looks like:
{
"id_token": string
"access_token": string
"refresh_token": string
"expires_in": int
"scope": string
}
We can use the “Unflatten from JSON” VI to convert the response into a cluster.
Note: The “Unflatten from JSON” VI provided with LabVIEW is not a reliable way to handle JSON. The VI will error and fail to parse if any attribute is missing from the JSON response. There are many 3rd Party LabVIEW JSON implementations available that provide more reliable behavior.
Making Resource Requests
At this point, we have completed the OAuth process and have successfully verified with the authorization server. We can now begin accessing the service’s API through the resource server. As each service has its own unique API, this blog will not cover API consumption.
To apply our authentication we need to set the Authorization header for every request we make to:
“Bearer “ + access_token
Wrapping Up
OAuth2 is not a difficult authorization process to implement in LabVIEW. The key to being successful is to implement a LabVIEW webservice to handle the redirect back from the authorization server. From there, it’s an exercise in data manipulation and data formatting.
While this post covered authorizing with the authentication server, it did not cover offline access for our application. Offline access allows our application to refresh our authentication token automatically without requesting permission from the user each time. I leave it up as an exercise to the reader to implement the refresh process.
Check out the follow-up post where we remove the web server dependency.