Recap
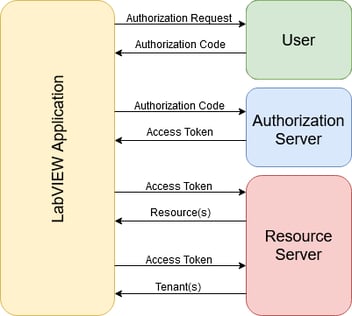
In my previous blog, we took a look at how to implement OAuth2 in LabVIEW. OAuth2 has an easy workflow where we launch a browser to a specific login URL, capture the redirect message from the browser, and finally request an access token.
Previously, we implemented a local webserver to capture the redirect message. While it was easy to do, it is not a very re-usable solution. What if we wanted to create a reusable library to handle a specific API? From my research, I have not found a way to distribute a webserver set-up with my library.
In this post, we will revisit steps 1 and 2 and look at a better way to handle the OAuth2 redirect.
The Hypertext Transfer Protocol
HTTP (Hypertext Transfer Protocol) is a set of rules for transferring data over the web. HTTP uses a set of request/response pairs to allow our web browser to request files from a web server and receive the response.
Knowing the details of HTTP is not necessary. However, the most important detail to pay attention to is the fact that HTTP is built on top of the TCP/IP suite. What does this mean? It means we don’t need a webserver. We just need to open a TCP socket!
Processing the Redirect
In my previous post, we registered an application (or integration) directly on Xero’s website. As part of that set-up, we specified a redirect URL for:
https://localhost:5002/OAuth/Redirect
This URL tells Xero to send an HTTP GET request to an open TCP socket on 127.0.0.1 using port 5002. So, after we launch the web browser to the authorization request URL, let’s open that socket ourselves!

Figure 1 - Opening the TCP Socket
In Figure 1, we create a TCP listener for localhost on port 5002. For this example, I am not specifying a timeout. This means the socket will listen indefinitely for incoming connections. If the user closes the browser and cancels out of the authentication process, this will block execution of the rest of our code and sit forever. It is recommended that you add a timeout and place the listener in a loop to provide a way for your application to cancel the authentication process.
The next step is to read from the socket.
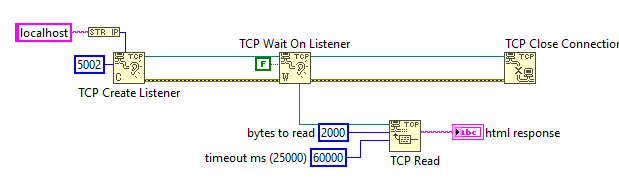
Figure 2 - Reading the TCP Socket
I I chose an arbitrary 2000 for the bytes to read property. The reality is, we’ll only need the first line of the response. A typical response will look like this:
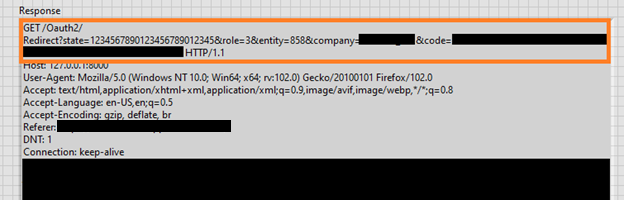
Figure 3 - The HTTP Response
The orange section is the only section we care about. It contains the full GET request URL and most importantly the “code” we need to handle the rest of our authentication.
Parsing this response is relatively easy. While my example in Figure 4 uses regex, it is not necessary at all. Everything in the orange box is terminated with a carriage return and line feed combination allowing you to split the string there. You can then further search for the keyword “code” and grab the data after the equal sign.
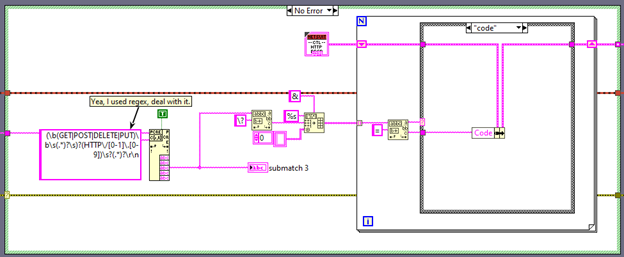
Figure 4 - Parsing the HTTP Response
Cleaning Up
Now that we can receive the redirect response and parse it, let’s add some feedback to the browser so the user knows we’re done.
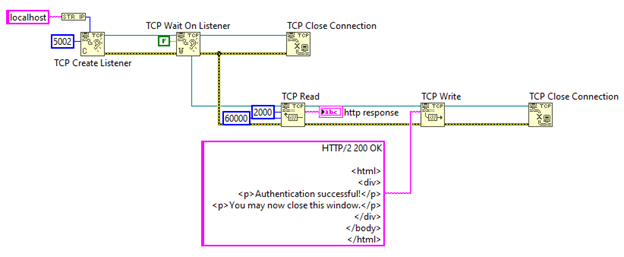
Figure 5 - Responding to the Browser
This will return some HTML for the opened browser to render. The HTML in Figure 5 is boring and not visually appealing so you will want to modify it for the look and feel that you desire.
And with that, we are done?
Wait, this isn’t HTTPS!
If we try to run this, we won’t get any valid response. OAuth2 requires transfer of data via SSL. If we try to configure Xero with an HTTP URL, it will refuse it.
The solution? Let’s add TLS to our TCP Socket.
Implementing TLS
The first step in adding TLS support, is to generate certificates. Generation of certificates is outside of the scope of this post. However, National Instruments has a great example of TLS communication that details how to generate your certificates. Search for the “TLS Client and Server with Self-Signed Server Certificate” example VI.
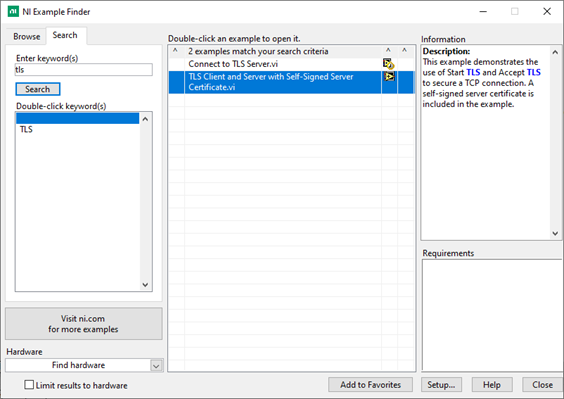
Figure 6 - TLS Example Finder
IIn the example, you will find comments by National Instruments detailing how to use the cfssl utility to generate the srv-key.pem and chain.pem files necessary to configure TLS.
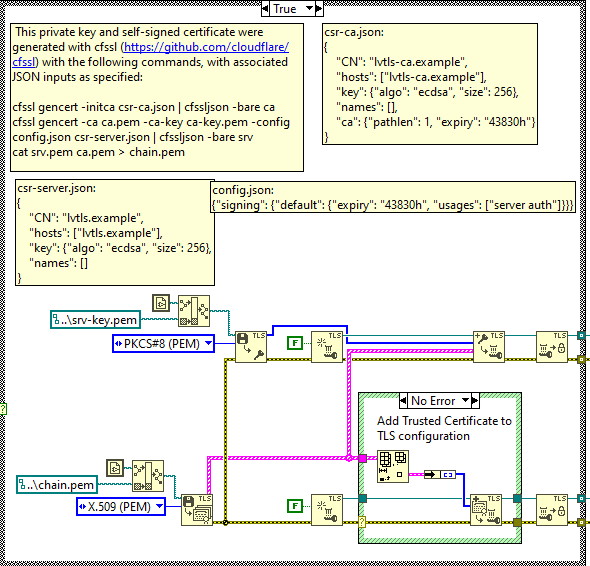
Figure 7 - CFSSL Comments
With our pem files generated, let’s apply them to the TCP socket. The steps to take here are:
- Load the private key (srv-key.pem) into memory
- Load the certificates (chain.pem) into memory
- Create a new TLS configuration
- Add the private key and certificates to the configuration
- Make the configuration immutable
- Configure the TCP socket to accept TLS
- Read the response normally
.png?width=1303&name=MicrosoftTeams-image%20(19).png)
Figure 8 - Adding TLS