Several months ago, I had the privilege to design and develop Erdos Miller’s Automated Survey Reports (ASR) system. The goal of the project was to provide a cloud-based system for aggregating surveys, MWD data, and directional drilling data to fill in HTML-based templates to be e-mailed to a user-configurable distribution list.
Developing software for the cloud brought on numerous challenges, however, one of the more impactful challenges was the reduced barrier to deployment. When working with cloud software, a simple push of code to a production server is all that is required to deploy software updates to all your users. This easy and direct deployment of software demands the need for better and more thorough testing prior to release.
Overview
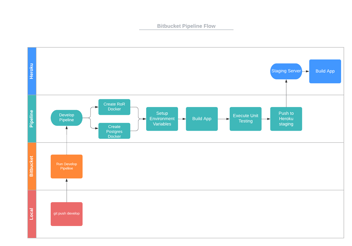
There are 4 major steps to preparing the application for a deployment pipeline:
- Identify the major components that are unique to the environment running the code
- Migrate unique components configuration to environment files
- Create and configure a Heroku pipeline
- Configure staging/production Heroku applications
Heroku and Deployment Pipelines
Heroku is a Cloud Application Platform that provides users a streamlined approach to configure backend operations like databases, web hosting, and deployment. Heroku provides developers with a source control repository, automated builds, automated Amazon Web Services configuration, and most importantly for this blog post, deployment pipelines. Deployment pipelines offer the necessary support for us to test ASR updates in a production-like (staging) environment. This staging environment is set-up in such a way that is resembles a clone of the production environment. In fact, the only difference between the two is the URL I point my browser to.
ASR Components
ASR has two running threads at any given time. First, there is the thread executing the web server. This is responsible for handling requests from a user’s browser and providing display information. This thread acts as the controller serving data from the model (database) to the view (user’s browser). However, ASR also has a second thread running in parallel. This thread handles the job queue. It is responsible for running “jobs” in the background, separate from the web server. There are two major jobs it is responsible for:
- Scan an inbox for e-mails from MWDs and DDs.
- Run the actual data aggregation and process e-mails to be sent out.
It is easy to test the web server thread in a staging environment prior to production release, however, the latter thread is where the real challenge lies.
Environment Configuration
When developing for a deployment pipeline, we need to consider the aspects of the software that are not common between staging and production. In the ASR example, the database, the e-mail inbox ASR scans, and the outgoing e-mail address are all unique aspects that should be separated between the two stages of deployment so that conflicts between the two servers don’t arise.
This is a perfect situation for environment configuration (.env files). These files are intended to be unique to every environment running the application’s code. In addition, these files are the ideal way of storing account credentials and API keys as they are local to each server/computer and never committed to source control.
Ruby on Rails provides the ENV[] array. We can place the contents of an environment file into this array to make it globally accessible to the application.
An example environment file for ASR:
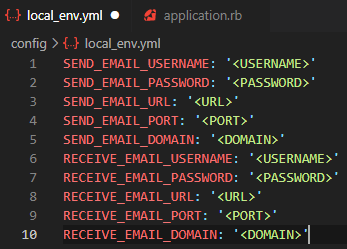
The corresponding code to load this file:
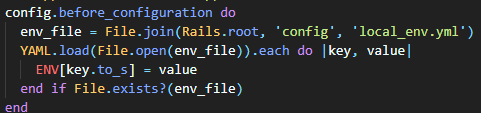
Heroku has built in support for environment files. The local_env.yml file and the corresponding loading code only applies when running in my local development environment. These settings are ignored when running on Heroku.
Database configuration is much easier. Both Rails and Heroku have support for easy database configuration. Our Rails database configuration file contains the following key configuration:

Heroku Pipeline Configuration
To create a new pipeline, navigate to your Heroku dashboard and select New > Create New Pipeline.
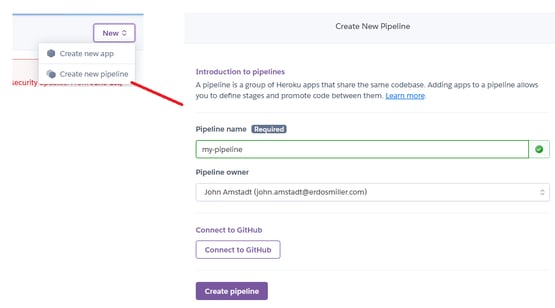
On the next screen, we need to configure our staging and production apps. Either click “Create new app…” or select an existing application.
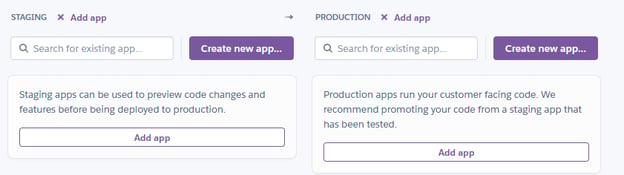
Configuring the Heroku Applications
Both applications need to be configured to use their own unique environment variables. Each application must be configured separately and thus the following steps need to be executed twice.
On the deployment pipeline screen, click on your staging application to open the application dashboard. On the dashboard, click the settings tab and click the “Reveal Config Vars” button.
Heroku has built-in support for Rails and provides some standard environment variables already. Most notably, the DATABASE_URL variable we used in our database configuration is pre-set for us.
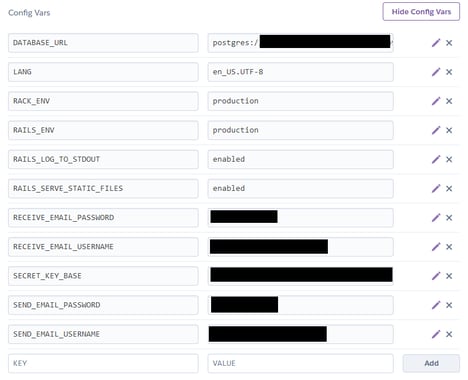
We can add additional key value pairs manually by typing them in at the bottom of the screen and clicking the Add button.
Input all relevant environment variables and their values here, then repeat the process for the production application.
Application Deployment
With the pipeline and application set-up we now have a development environment, staging/testing environment, and a production environment.
The process for deployment is very simple.
- Write and test code in your local development environment.
- Push the code to the staging environment for further testing.
- git push heroku master
- Promote the staging environment to production
The first two steps are beyond the scope of this post. The final step (promotion to production) is a very simple click of a button.
On the Heroku pipeline dashboard, locate the staging app and click the “Promote to production” button. Heroku will handle the rest for you.