Making a schedule from a blank set of rows and columns can be tricky. It’s tough to get the proper sequence of events right in your head, and it’s easy to second-guess every task summary and time estimation.
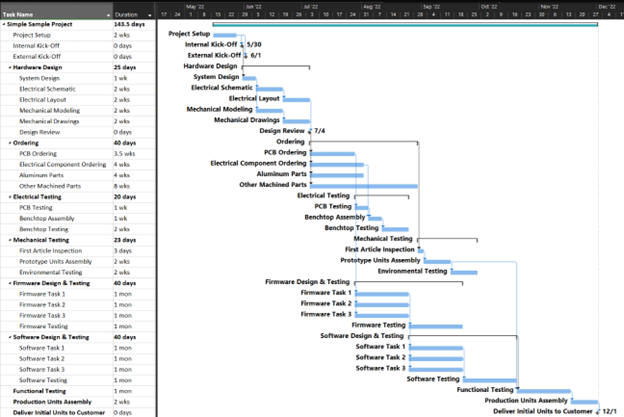
To help you with building a product schedule of your own, here is an example project that includes mechanical, electrical, firmware, and software design along with procurement, assembly, and testing.
Every project is different, and your project probably will not exactly follow these steps. However, seeing a schedule in front of you makes it much easier to spot inconsistencies and irregularities than trying to write a perfect schedule from scratch.
To start off here are a few caveats and assumptions:
- The task durations for everything except ordering are arbitrary.
- The tasks should be split up into specific, achievable goals instead of these generic terms
- The layout assumes tasks can’t start sooner than when is prescribed, whereas usually there is planning work done before and documentation work done after each task.
- And finally, a real schedule should consider the availability of team members when planning task durations and should include slack wherever possible.
Kickoff
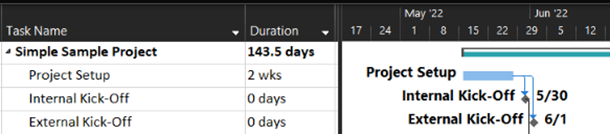
When the project is finally approved, there is a temptation to go, go, go right away. Instead of dragging engineers off the projects they’re already working on, let the customer know that it will be 2 weeks before work begins once the project is approved. Use those 2 weeks to refine the schedule, setup the budget, discuss risks, and otherwise ensure that you are prepared to manage the project once work begins.
- Critically, review the scoping documents to make sure your plan includes everything required and does not add extra features.
After the setup work is complete, kick off the project internally with your team to let them know the scope and schedule for the project. Then, bring your team and the customer’s team together so your team members can trade information and be aware of who to contact for help.
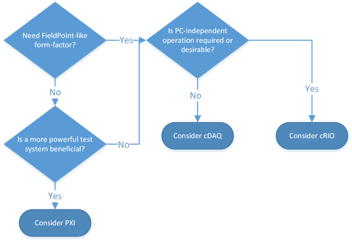
Hardware Design
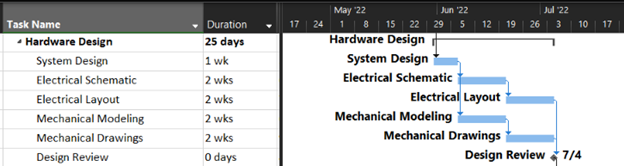
The first step in creating a product is to overview the entire system, and then to design the hardware. The system design step can start before the internal kick-off, and usually involves setting up block diagrams to map out the major components of the product and how the components interact with each other.
- For example, one diagram might cover the electrical components with descriptions on how the parts will communicate with each other, while another diagram shows the same components but with callouts for the specific connectors and wiring needed to carry those signals.
After the system layout is complete, the electrical and hardware design can proceed side-by-side. This will require a back and forth between the engineering teams to make sure all the components are mounted correctly in an acceptable form factor.
Once the review is complete and both your leadership and the customer’s approve the design, the parts can be ordered.
Ordering

Ordering parts seems simple since the lead times are printed right there on the quote. However, be sure to add on an extra week and a half to that number to account for RFQ delays, manufacturing issues, and shipping.
- PCBs are usually the critical path item for design, so paying to have a faster lead time from fabrication shops is usually worth it. To prevent delays, PCB designers should check for components that have long lead times so they can be ordered early.
- Electrical components such as sensors, PC cards, modems, etc. are typically ordered off the shelf, with some sensors requiring a few weeks. Try to design as many components as possible to be off-the-shelf and minimize custom solutions.
- Aluminum parts have quick turnarounds for most shops, depending on the complexity.
- However, machining other materials can be laborious. If you’re relying on parts to quickly be made of a hard or exotic material, expect to see long lead times.
Electrical and Mechanical Testing
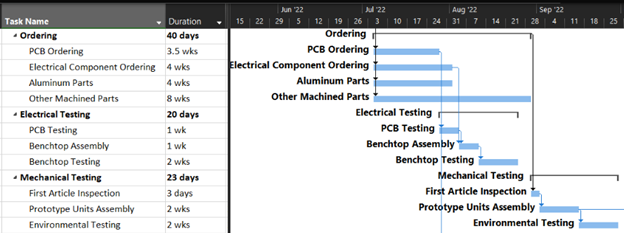
Once the PCBs come in, a lot of work can start at once. The PCBs themselves need to be tested to make sure the boards function properly, and firmware designers can start using them to develop code for the onboard chips. Further, once the components have been received the entire system can be laid out on a bench, sans mechanical mounting, to be used as a testbed for engineers.
On the mechanical side, once the parts have been inspected, they can be used for fit testing, for checking ease of assembly, and for confirming the environmental and functional requirements for the product.
Firmware and Software Design

Firmware and software are different beasts than hardware. Hardware design tasks can rely on ‘waterfall’ scheduling where one task leads into another, but coding is typically developed fluidly with barebones functions being made more and more complex over time. To capture this, I recommend putting firmware and software tasks as a large block that happens all at once with each task still called out. This way you can still track the % complete for each task but you don’t assume one happens before another.
Testing firmware and software is also a different animal. Testing happens throughout the design process and doesn’t occur after all features are complete like is shown in the schedule above. However, planning for that extra time to dedicate to testing is critical. Firmware and software are the last design steps and keeping to deadlines means they get squeezed for time by any delays that occur before them. Adding the extra time in the schedule gives the designers breathing room at the end of the project.
Final Steps

After the components of the system have been individually tested, the entire system can be validated. Like with software testing, this step is typically squeezed for time so set expectations with your customer that give you slack near the end of the project.
After validating everything, the Functional units can be assembled and validated for delivery to your (hopefully) happy customer.
Communicate any delays quickly, watch for stalled tasks due to miscommunication, and make sure to track the schedule every week to make sure your predictions are still accurate. With effort, your schedule can become reality.
Here is the full schedule for reference: