3D Printing and its widespread use has been a long time coming and seems to have always been “the next big thing”. The likes of Isaac Asimov promised us almost 50 years ago that we would someday have a magic box with a button and whatever tool engineers needed would instantly pop out. Although we aren’t quite on that level yet we are getting increasingly close. As more exotic filament and materials become available, 3D printing is finding more and more use as fixturing, tools, packaging, and even sellable products. It’s not difficult to understand why either, custom fixturing or test fit components that are normally precision machined could cost 100’s of dollars with several weeks of lead time, whereas a plastic 3D print only costs a few dollars if that and can print within a few hours. Many engineers/businesses have great difficulty in creating useful 3D printed parts and I hope to cover a few of the major obstacles in this blogpost.
1. The Economics of 3D printing:
The first obstacle for most businesses is just purchasing a 3D printer. The engineer wants a $1000 machine to print plastic? No way! While the prospect may seem outrageous at first, consider the cost of a machined fixture for a test stand or some other component involved in your production process. Any engineer worth his salt should be able to identify what fixtures requires tight tolerancing (±.005”) and which ones don’t. If one of your parts happens to fit this bill. 3D printing tolerances can be excellent, less than ±.01” for most plastics, and you could take a precision machined component and replace it with a plastic one.T To most slicing softwares offers estimates on the amount of material used, which allows you to estimate the 3D printed parts cost. If a machined component costs $100 and you print just 10 of them, the machine pays itself off within a week or two. Then beyond that point you are saving hundreds, if not thousands of dollars in the future.
2. Selecting a filament:
So we identified that having a 3D printer makes sense financially but what about on a technical level? Well, there are many high strength/high temperature filaments available at an affordable price. PLA and ABS do the trick for most simple parts that are not loaded heavily but there are Nylon and Carbon fiber reinforced filaments for when you need additional strength. The high strength materials are also usually high temp and can be placed in ovens for typical “burn in” or general high temperature testing for electronics. If you prefer dimensional accuracy and appearance over function you could also look into resin printing which can offer ±.001” accuracy on your prints and looks fantastic!
3. Engineering a better print:
Ok we got our filament, we got our printer, you put the filament manufacturer’s settings into your slicing software and you went to go print your model and its spaghettis…Well sometimes, especially for more exotic materials, or if you are printing a difficult to print model, the print will fail and the settings need to be optimized. But before we go and tweak all our settings lets figure out what exactly is a difficult to print model? Well it looks a little something like this:
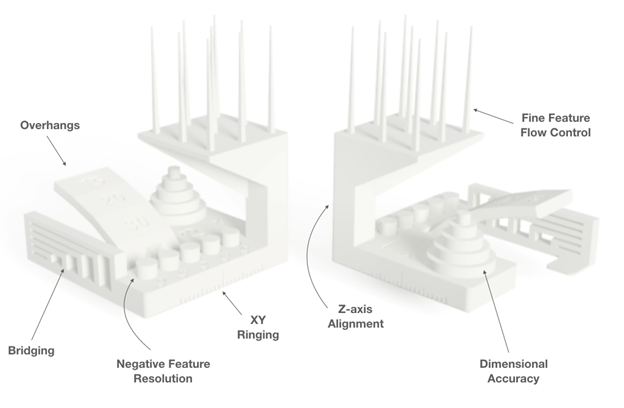
And no this isn’t an MC Escher painting, it’s a 3D Printer torture test! The only way to know what features our filament or printer is bad at printing is to test them! This model, which you can find @ https://github.com/kickstarter/kickstarter-autodesk-3d allows you to test most of the major problems when printing with just one print. If your part has a large overhang, bridging, or close together features you can simply test them and tweak your settings to get everything as close to perfect as possible. If you don’t know what overhang or bridging means…google them! Oftentimes you will find someone who has a similar problem to you and may recommend settings that work for you! The process of fine tuning a printer and filament takes some time and effort but once you are dialed in, you are dialed in forever for that printer/filament!
4. Pushing the limits:
Alright we are all dialed in but what kind of useful stuff can we actually make? Well for starters there are many sites that offer free models that you can use for inspiration like https://www.thingiverse.com/ , https://www.yeggi.com/ , or even https://www.reddit.com/r/functionalprint/ . You may find something similar to what you need but what if you want to add fasteners, hinges or some other mechanical operation? Well you can actually 3D print threads and other simple mechanisms! Take a look for yourself and experiment. My personal favorite way to add threads to a print is by making a cutout in the print for a square hex nut, making a pause in the print at the top of the cutout and placing the hex nut in. We now have durable, strong threads with fairly cheap parts. Given the respectable tensile strength of common 3D printed plastics, you can achieve strong parts that rival their metal counterparts (but only in perpendicular to the direction that the print is printed!).
5. Applications:
The EM team is finding more and more uses for 3D printing and we have found that high temp carbon fiber prints are incredibly useful. We are able to replace some difficult to source covers and components with it and can even use it in testing equipment to protect board components and wires from being damaged. Additionally the prospect of 3D printed PEEK is enticing and could be incredibly useful in producing cheap centralizers and other components. Heck, it may be possible (and affordable) to 3D print an entire PEEK chassis someday! The day where we send 3D printed components downhole is within reach and I look forward to making good on Ol’ Asimov’s dream!